You can use narrative / diagrams to condense and clarify your explanation. For my Launch School studies, I do this once a week on Saturdays. I keep a list of new methods that I’m learning about during the week. Particularly towards the end of RB101 these started to mount up. Then on the weekend, I’d take the list of methods and test myself by writing out (by hand, with pen and paper) code that illustrated how to use each method. If needed, I’d write or say out loud an explanation relating to that method. This is a humbling exercise; you realise that you don’t know the things that you thought you knew.
- Write blog posts to explain anything that feels unclear
My last blog post is an illustration of this. I was having trouble getting what the .zip method could be used for and how it transformed things to which it was applied. So I wrote up some notes to myself in the form of a blog post.
I sometimes worry that too many of these posts — written purely for me to understand something — are alienating for those who subscribe to the blog via something intrusive like the email newsletter. I considered putting my ‘writing for the purposes of understanding’ posts in a separate location. In the end, though, I’m probably overthinking it. Like it or lump it!
- Make mental models of how things work
A lot is made of this, both at Launch School and in the wider world of study techniques. I’m not sure I have too many examples of where I’ve formally had to think through something using a mental model of how it works. I imagine this will start to be more applicable in later courses. Or perhaps it’s just that I already have some mental models for how the code behaves owing to my previous studies in coding. At any rate, I’m keen to get the most out of this but so far haven’t found it to apply too much.
- Make a cheat sheet at the end of a topic
I haven’t done this yet, though I can see how it’d be useful. For my current course and assessment, I think it’s probably hard to do — i.e. condensing the Ruby language to a single sheet of paper. But I’m reserving the right to do this at a later stage.
- Spend time reading the code of others
I tried to do this a little bit while going through the exercises. My hesitation was initially that the code hadn’t been reviewed or formally assessed and I didn’t want to absorb bad patterns from others who — like me — were likely at the beginning of their journey and who couldn’t be expected to know if they were writing something that should be emulated or not.
In the end, I think it’s still useful to read the code of others. It’ll usually be somewhat clear or not whether an answer is overly complicated. And answering why you think that is in itself a revealing process.
Review
The Launch School syllabus takes a year or two to get through. You start off with Ruby, but later on you’re working on Javascript or whatever. The concepts and the methods and the details could easily start to get forgotten if you’re not regularly reviewing and practicing things you studied in the past.
- Anki as the cornerstone for spaced repetition
As evidenced by the large number of cards in my Anki deck, Anki occupies a central place in my strategy to outsource the need to worry about reviews and recall over the long-term. If there’s something I want to be able to recall a year from now and it’s not something I’m using literally every day or two, then it’s going to end up in Anki.
An important note, though: learn the material FIRST, before adding it to Anki. I’ve learned this the hard way in the past; if you don’t learn it before adding to Anki, you’ll find Anki becomes slow and filled with a sense of drudgery. It’s also inefficient to group those two very separate tasks into a single moment at the point where you’re reviewing a card.
The great thing about Anki is that as a particular fact passes from your short term memory to your long-term memory, the need for reviews becomes less frequent, so you’ll see it less often. Trust the spaced repetition algorithm. It knows what it’s doing.
- Explain a concept out loud
This overlaps with the Feynman technique (see above). You can do this on your own, or to a friend / captive audience. Doing this with people who are much older or younger than you can be instructive as to whether you actually understand a particular topic.
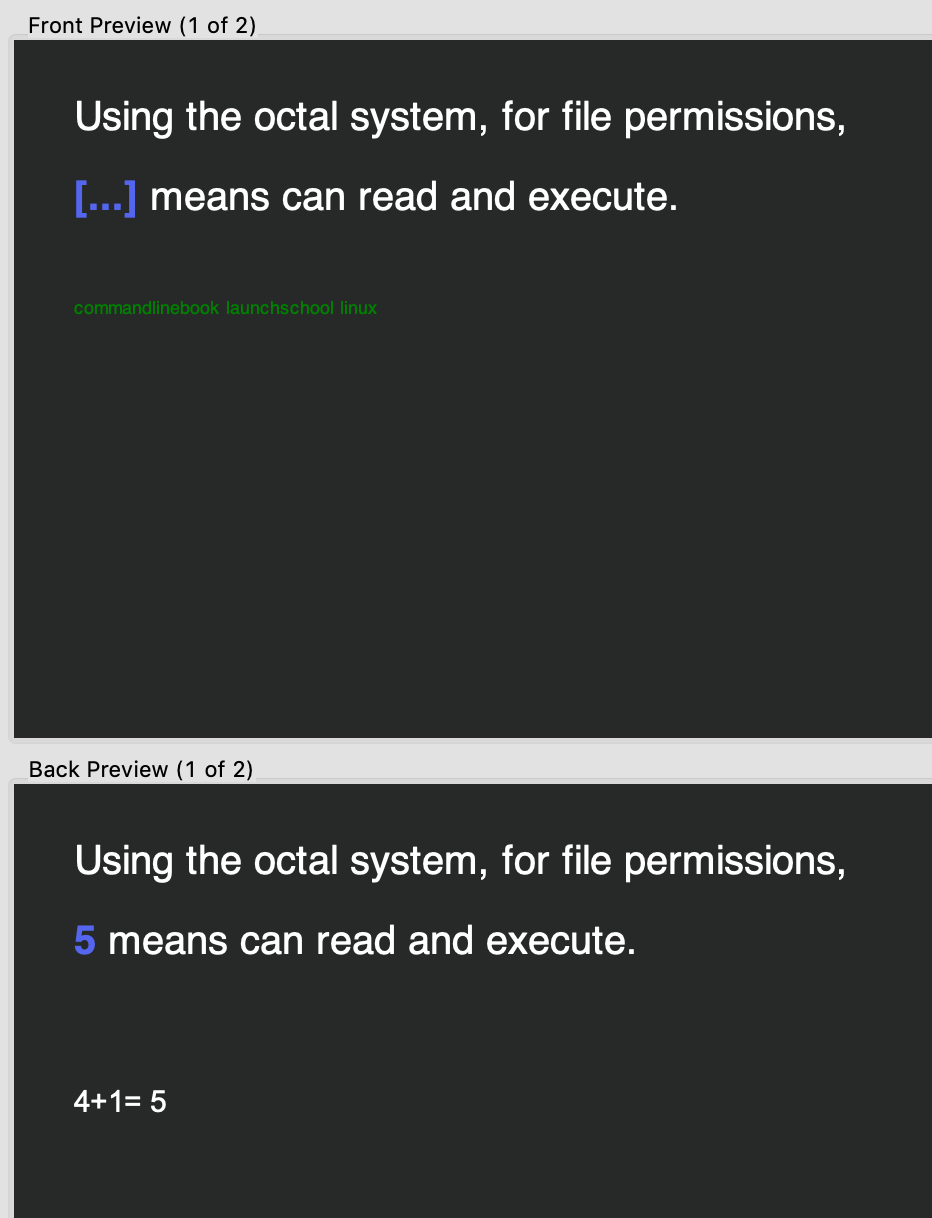
I sometimes build this in as part of my Anki studies. I’ll have a card where the front says “What is [concept x or whatever]? Try explaining it out loud.” Then I’ll either find someone to do this with or I’ll just do it myself. Then on the back of the card it’ll either have a small list of key sub-concepts to make sure I got it right or it’ll say “Go look at your notes to confirm that you covered everything important”. This way I’m getting prompts to review old material, but they’re reoccurring at regular enough intervals that I don’t have to worry about having to do this too often.
- Keep Ruby / other fundamentals sharp
People in the forums mentioned that when they moved on to Javascript or other parts of the course, they found their Ruby skills starting to atrophy. Many said they wished they’d been more formal about reviewing old materials and keeping those skills fresh.
I think this is best solved by doing regular code challenge exercises as provided by sites like those listed above. I’ll use Beeminder to keep me honest and doing at least one or two every few days.
People suggested that roughly 20% of your weekly study time should be devoted to reviewing old materials. I wonder if that’s a little high, but for me that might translate to keeping a solid hour or two on Saturdays for review of those old materials. And by review I mainly mean active recall using some of the techniques mentioned above, and then reading through notes to confirm whether I still knew something or not.
Getting Stuck
This is where I struggle the most with coding — the mental game of failure. But having a process to deal with those moments — because they will come — addresses a good chunk of the issue when it comes to getting stuck. The following are possible options for working through it, as suggested by fellow students / instructors:
- Read the error messages thoroughly
- First try it with pseudocode
- Solve problems on your own before looking at solutions or asking others for help. (If you can’t solve it, and depending on the size of the problem, still don’t look at the solution until a day or two has passed).
- Use the rubber ducky method of talking through a problem. (This can be translated to writing as well, where just the act of writing up where you’re stuck can often be enough to get you unstuck)
- Don’t cheat yourself of the opportunity to learn if the problem is difficult. Work through it and take your time.
- Use the PEDAC system / process
Everyone studying at Launch School is doing so remotely. We’re all scattered around the world, but doing thing with others can be really helpful with motivation. I don’t always find it the most time-efficient way of studying, but working with others in a structured manner seems to be strongly recommended by posters in the forums. For me I think this will take two forms: attending the group study sessions appropriate to my particular level, and interacting with discussions on the forums and Slack channel.
I might supplement this with ad hoc study groups depending on my need for that during assessment preparation. At any rate, there seems to be a good deal of opportunity for that kind of thing among fellow students.
A lot of this comes under the rough category of ‘life fundamentals’. Most shouldn’t need too much explanation.
- Stop using / viewing social media or meaningless input — for me that’s Twitter and YouTube. I have turned this off completely outside specific windows.
- No email — I also have email turned off everywhere except outside certain windows. On my phone, I’ve set it up that I don’t have access to IMAP mail via apps or the standard ‘Mail’ app, but I am able to send mails through SMTP email.
- Be careful with caffeine / tea — I don’t drink coffee, but some varieties of tea cause me to get a little too edgy and scatter-brained. So this is just a reminder to be conscious of that and always err on the side of caution. Also, periodically taking 1-3 weeks completely without caffeine (as with salt) allows me to reset my baseline, needing less to cause the stimulating effect it has.
- Keep the house / room clean
- Go for a walk every day
- Exercise — do it.
- Sleep — this is maybe the most important item in this entire post for me.
Scheduling Study / Core Routine
I try to study a minimum of two hours every day on average, moving up to a stretch goal of three or four if I am able. This allows me to make meaningful progress in my studies. Ideally, I try to have at least one day / week which is a 3-4 hour uninterrupted slot. But probably four hours is my maximum when it comes to focused, productive work.
I could probably do a few days of full-on / flat-out work, but eventually I’d burn out. The trick here is to do enough that you can always work the next day. This means not working from a place of exuberance or excitement. Learning and coding doesn’t have to be high-octane. That doesn’t mean it can’t be enjoyable or satisfying, needless to say.
This means starting with reasonable weekly hours and slowly increasing them rather than jumping straight into an intense pace of 5 hours a day, let’s say.
For me, this initially looked like starting with 15 hours per week and I’m currently at around 18. Reaching somewhere around 25-30 would be my ideal, but I have to listen to how my mind and body responds, and have to balance other work to support (read: pay for) this course of study.
- Create a routine / habit around Launch School study
For me, this means having my studies as the first thing I do in the day. I want to give it the time when I’m at my best during the day, so that means first thing in my morning. I potter around for 30-60 minutes after getting up, and then I immediately start work on my studies.
I covered this above a little, but basically for me it means using tools like Freedom and Focus apps to keep me honest and not distracted. I’m fairly good about using these tools, but not always and it’s easy to notice the difference.
I usually segment my studies with inbuilt short breaks. These can be anywhere from 5-10 minutes and I try to get up, stretch or do some kind of physical exercise / movement. For Macs, the Move! app is a great utility. I like to take somewhere between one and two breaks per hour on average.
- Think about posture early on
This is something which I haven’t thought too much about, but people on the Launch School slack channel and elsewhere have suggested it’s important. If you’re going to spend hours behind some sort of laptop, getting posture and ergonomics right seems like a good thing to aim for. I’ve had good experiences with the Ninja Standing Desk (sadly not being produced any more, it seems!) though I don’t currently have it with me. This is something to return to in a few months.
I take one day off each week which is for non-tech things, or family or friends. This is usually Saturdays for me but not always. I turn off phones and laptops and don’t let myself use them for the whole twenty-four hour period. I sometimes lose this habit when I have too many things going on and am overcommitted — witness that I’m currently writing this blogpost on my supposedly sacred Saturday ‘day off’ — but in any given year I’ll stick to it perhaps 80% of the time. The more I work on Launch School the more I’m reminded that it’s a good thing to disconnect from digital input and reconnect with the world around me.
- A routine for the end of the day
Currently the two key parts to this involve writing down what’s coming up tomorrow and where to start with them. It also includes making my environment conducive to just starting work the next day — i.e. cleaning my desk.